Data Sharing

In Zhylar CRM, data sharing means sharing records you own with another user. This allows users who cannot access those records to collaborate. It governs how records are shared between users within the organization. These records could be from leads, accounts, or deals module. It helps teams collaborate by sharing records with each other. Data sharing is applicable at organization level and is applied at module level. This means that data can be shared with all users of the organization, or with none at all. The organization admin decides this for specific modules. (Example: If data sharing is public read for leads, then all records within the leads module are visible to all organization users. This is only applicable to leads).

When data sharing is turned ON:

  • Other users can see records they don’t own.
  • Depending on sharing settings, they can also edit, update, or delete those records.
  • Teams can collaborate easily without waiting for the record owner.
Zhylar uses a top-down role structure. This means your data access depends on where you stand in the company hierarchy.

Default role assignment

  • The first user in Zhylar is the Org Admin– This is the business owner. By default, this role is named CEO.
  • All other roles are created under the CEO in a tree-like structure.
  • Role names can be changed to match your company (e.g., Manager, Sales Lead, Marketing Executive).
  • CEO (Org Admin – Root Level)

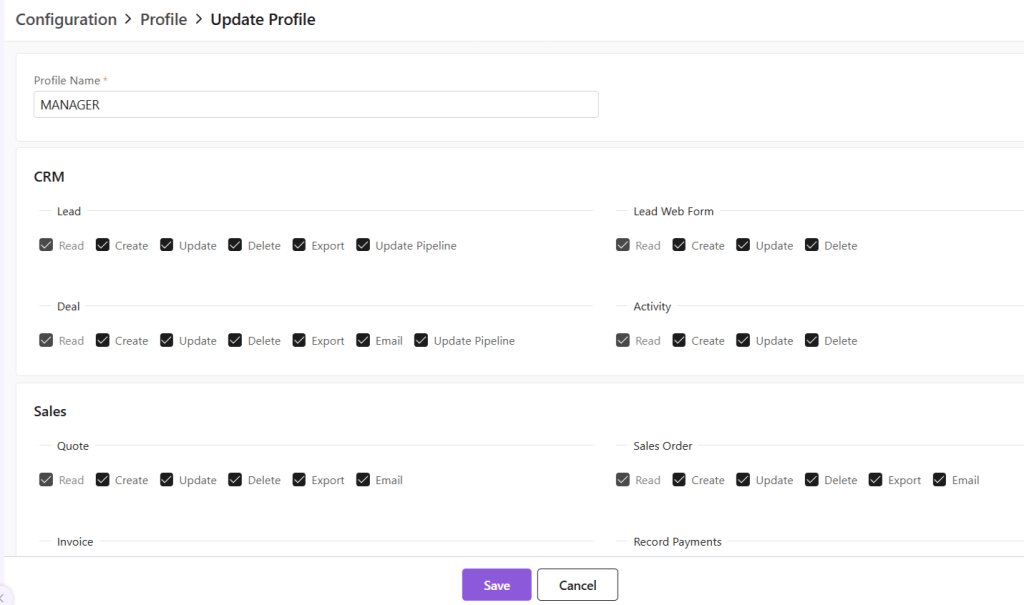
Role-level permission settings

Cross Role :- People with different role with same reporting role (example both COO & CFO reporting to CEO, so CFO & COO are cross roles) Peers:- People in same role are called peers (Example Sales intern role has 4 individuals in it so they are peers to each other) This determines the type of data access granted to the role (even when Data Sharing is turned off).

Data visibility for cross role

  • What it does: Lets people at the same level see each other’s data.
  • Example use cases:
    • Sales Reps can see each other’s deals and leads.
    • Marketing Coordinators can check campaigns of peers.
    • Managers can view work of other managers at the same level.
  • Access type: Read-only (can see but not edit).

Data sharing for peers

  • What it does: Lets people at the same level work together on each other’s data.
  • Example use cases:
    • Sales Reps can hand off accounts to each other.
    • Two Reps can manage deals together.
    • SDRs can share lead nurturing.
    • Managers can work together on projects.
  • Access type: Full access (create, edit, update, delete based on settings).

Data sharing configuration

Data Sharing controls how records (Leads, Deals, Accounts, Contacts, Quotes, Invoices, Cases) are shared. Below are permission available in data sharing
  1. Private
  2. Public Read
  3. Public (Read + Write)
  4. Public (Read + Write + Delete)

Private access

  • Only the record owner has full rights (create, read, update, delete).
  • Others cannot see it unless sharing is given.
  • Example use cases:
    • Sensitive client info.
    • Territory-based leads.
    • Commission-based deals.
    • Compliance rules.

Public access

  • Everyone in the company can see and sometimes edit the records.
  • Different permission levels:
    • READ: Everyone can view records.
    • READ + WRITE: Everyone can view + edit data.
    • READ + WRITE + DELTE: Everyone can view, add, and delete data.
Examples:
  • Public (READ): All leads are visible to all organization user for market research.
  • Public (READ + WRITE): All leads are visible to all organization user with Edit access for market research.
  • Public (READ + WRITE + UPDATE): All leads are visible to all organization user with Edit / Delete access.
Data Sharing Example

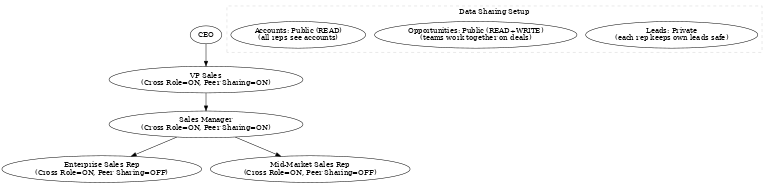
Example: Traditional Sales Organization

Hierarchy:
  • CEO → VP Sales → Sales Manager → Enterprise Sales Rep → Mid-Market Sales Rep
Role settings:
  • Enterprise & Mid-Market Sales Reps:
    • Can see data of other roles (If Cross Role = ON).
    • Cannot share their own data with same-level peers (If Peer Sharing = OFF).
  • Managers (Business owners, VP, Sales Manager):
    • Can see across roles (If Cross Role = ON).
    • Can share with peers at the same level (If Peer Sharing = ON).
Data sharing rules:
  • Leads → Private → Each rep keeps their own leads.
  • Opportunities (deals) → Public (READ + WRITE) → Teams can work together on deals.
  • Accounts → Public (READ) → Everyone can see accounts to get market knowledge.

Important points to remember

  • Data sharing rules are applicable across the entire organizational structure.
  • Changing role hierarchy instantly changes who can see what.
  • Changing data sharing rules affects both old and new records.
  • If you move a user to a new role, their access changes automatically.
  • Bulk uploads follow the current sharing rules.
  • Data Sharing rules supersede all other permissions.
  • A user without access to a particular module will not be impacted by data sharing changes. For example, if User A does not have access to the Leads module, turning data sharing on across the organization will not affect them at all.
Zhylar makes it easy to balance privacy (when you need control) and collaboration (when you need teamwork).

Also Read

User Management  

Email Templates

Email templates in Zhylar offer pre-designed formats for quick communication, consistency and ensuring accuracy. These templates can be customized for brand alignment.
  • Log in to Zhylar
  • Go to Left-hand navigation panel
  • Click on Configuration
  • Under Configuration tab, select Email Template.
  • Create templates for:
    • Deal
    • Quote
    • Sales Order
    • Invoice
  • If email is sent from an integrated personal email ID, replies can be sent to the email.
  • Navigate to desired tab
  • Click + New Template.
  • A side sheet will open.
  • Enter template name
  • Note: Two templates cannot have the same name in the same module. The system will not allow duplicates.
  • Fill out remaining fields
  • Insert variables if required to customize your template. Variables are placeholders used to dynamically insert specific data—such as a customer’s name, deal value, or due date—into templates, emails, or documents
    • List of variables differ from module to module.
The image below represents the variables presented in the Sales Order module:
  • For example, if SO Expiry Date is selected, the system will automatically pick the expiry date added from the sales order.
  • Or, Contact Name is selected, the name willl be picked directly from the name added to the SO.
  • if Click Save.
  • The field options in all templates are the same except in customer portal. Here, only a Template Name, Subject and Body can be added.
  • Are you stuck whilst writing your emails?
  • At a loss for words?
  • Not sure how to write a message that will surely make an impact on your clients?
No reason to worry at all because Zhylar offers an AI email generator.
  • Click on AI ✨
  • Provide a prompt for the nature of your email.
  • The AI Email generator has generated email content.
  • Once the text is generated, you can:
  • Refine: Based on your preference, you can ask the AI email generator to refine the text.
  • Insert: Add documents or files
  • Replace: Click on Replace to add this text by removing the existing text in the email (if any)
  • Once done, click on Save to save your AI-generated email template.
  • Marked by a white star in a purple circle.
  • First template created under any tab will be automatically marked as default.
  • To Change default template, go to List View
  • Click ⋮ 3 dots
  • Select Mark as Default.
  • If there is only one template in the system, the existing template will be marked as default automatically.
To update a template,
  • Click ⋮ 3 dots
  • Select Update
  • Make your changes.
  • Click Save.
To delete a template,
  • Click ⋮ 3 dots
  • Select Delete
  • Provide confirmation.
Note: A template marked as Default Template cannot be deleted. Units of Measurement General Settings Currencies  

Document Series

What is a document series?

A Document Series is a structured numbering system applied to documents like invoices, quotes, and sales orders (e.g., INV-2025-001) to ensure consistency, efficient tracking, and easy communication.

Benefits of document series in CRM

  • Automatic sequential numbering
  • Professional document presentation
  • Easy organization and retrieval
  • Audit trails for all transactions
  • Ease of Continuity in case of Data Migration

Getting Started

Viewing Existing Series

  • Log in to Zhylar
  • Go to Left-hand navigation panel
  • Go to Configuration
  • Under Customization, click on Document Series
Lists the document series for following modules:
  • Quote
  • Sales Order
  • Invoice
  • Transaction

Document Series Format

Basic Structure

  • Prefix: Constant identifier (e.g., “INV”, “QT”)
  • Suffix: Auto-incremented number (e.g., “00001”)
  • Final Format: [Prefix]-[Suffix] Example: INV-0001
  • Automatic ascending order:
    • Example of successive sales orders: `INV-0001` → `INV-0002 → INV-0003
    • No duplicate numbers allowed
    • Suffix cannot carry any alphabets.
How this works:
  • System applies prefix automatically
  • Number increments with each successive document

Update Series

  • Click on any series to edit format by clicking on the yellow pencil:
  • Make changes.
  • Click Save.
> Note: Changes only affect new documents – existing records maintain original numberings

Important Notes on Editing

  • Suffix Updates:
    • If changing current suffix (e.g., 0002 → 0012):
    • All future documents use new sequence (0013, 0014 etc.)
    • The numbers that have been skipped cannot be used in the future (0003-0011 in this example)
    • System will show an error if attempting to use skipped number
  • Prefix Updates:
    • Affects only new documents
    • Existing documents keep original prefix

How this works

  • Prefix auto-applies to new documents.
  • Suffix auto-increments.
  • Skipped numbers cannot be recovered – plan edits carefully.
Discover how Zhylar can streamline your sales and elevate your business processes. Visit our website or book a demo today to experience the difference!

Also Read

Web Forms General Settings Basic Terminologies

Document Templates

Document Templates in Zhylar offer pre-designed formats ensuring consistency, saving time, reducing errors, and creating professional documents. Three default templates are provided for the following modules-
  1. Quotes- Outline proposed pricing/term + Speed up quote-to-invoice process
  2. Sales Order- Confirm purchase details + Streamline order management
  3. Invoice- Detail billing information + Track payments efficiently
  • Log in to Zhylar
  • Go to Left-hand navigation panel
  • Click on Configuration
  • Under Customization tab, select Document Template
  • You will automatically land on the Quotes tab.
  • Navigate to the tab required.
  • Few system templates available per module.
  • One template will be marked as default denoted by a white star in a purple circle.
  • Click ” + New Template”
  • One pre-loaded templates will open for you.
  • If required, from the Default Template layout field, choose another template and begin.
  • Once template will be marked as a default template. This is the template that will be auto-applied to the document unless changed. This is indicated by a white star in a purple circle.
  • Customization in the following sections:
    • Template Details- basic layout of the document and major customizations in font, alignment, theme, etc.
    • Organization Details- Details of the seller’s organization
    • Customer Details- enter customer’s details
    • Document Details- enter data to be added on the document
    • Table Details- Information about the item and related details
    • Summary Details- Includes final payment details such as discount, T&C, shipping details etc.
  • This is the blueprint of the document.
  • The template name is a mandatory field to be filled.
  • Add/edit basic details of the template; name, layout, etc.
  • Major stylistic customizations made in this section, such as font, font size, title color, etc.
  • All changes in this section are optional.
  • Template Information section covers the major information to be added to the document.
  • Mandatory fields carry basic data that must be provided on the document. They are:
    • Due Date
    • Quote/SO/Invoice Date
    • TRN (Transaction Reference Number)
    • Short-Code
  • Optional Fields
    • Other fields in this section are optional- Donated by a check box beside the field.
    • If checkbox is ticked, information must be provided for that field.
    • If checkbox is not ticked, that section will be removed from document.
  • Make adjustments and customizations.
  • After making changes, click “Refresh” if you want to preview
  • Click “Save” to confirm
  • Click ⋮ 3 dots
  • Select Set as Default
  • Click ⋮ 3 dots
  • Select Update
  • Make changes
  • Click Save

Please note

  1. All templates share same creation/management workflow.
  2. Custom templates created by users can be set as default.

Also Read

Document Series Quote Sales Order  

Profiles

In Zhylar, profiles determine what features and functionalities a user can access within the platform. Profiles control “who sees what” based on hierarchy. Profiles define “what a user can do.” This includes creating records, editing data, or generating reports. Zhylar assigns the right profile to ensure every team member has the exact tools they need. This helps them perform their job efficiently without unnecessary clutter or access.
  1. Administrator/Admin
  2. Manager
Permissions refer to the specific actions or data that a user can access within their assigned Profiles. Permissions are more granular than roles. They dictate exactly what each user can do with the data. They also define the features users can see.
  • Read
  • Create
  • Update
  • Delete
  • Export
  • Update Pipeline
  • Email
  • Manage Configuration
To get started, follow these steps:
  • Log in to Zhylar
  • Go to Left-hand navigation panel
  • Click on Configuration
  • Under General Settings tab, select Profiles
  1. You will be able to view all the Profiles as shown in the image below.
  • Two default Profiles are pre-loaded in the system- Administrator and Manager.
  • The Administrator is the CEO. This profile cannot be updated or deleted in any way.

Add New Profile

  1. Click on the “+ New Profile” button.
  1. A new page will open.
  1. Fill out the Profile name and click on the permissions to be provided to the said Profile.
  1. Click on Save to add Profile.
  1. There are 2 default Profile, namely, Administrator and Manager.
  1. The Administrator Profile cannot be edited.
  1. To update a Profile, click on the yellow pen at the end of the Profile you want to edit.
  1. A new page will open.
  1. Update the permissions provided and click Save.
  • Click Save.
To delete the Profile,
  • First click on the yellow pencil to go to Update view.
Now, click on “Delete Profile” at the bottom-right corner of the page.
  • Now, confirm you want to delete the role by clicking on Yes.
  • The role will be deleted.

Also Read

User Management Roles and Data Sharing  

Bank Details

In a CRM system, bank details refer to the financial information of customers, vendors, or partners. This information is utilized for billing, invoicing, refunds, and financial transactions within the platform.
  • Log in to Zhylar
  • Go to Left-hand navigation panel
  • Click on Configuration
  • Under Profile tab, select Bank Details.
  • Shows a list of all the saved banks.
  • Bank marked with purple star is primary bank.
  • In Zhylar CRM, a primary bank is the default account managing payments, refunds, and transactions.
  • This bank will be loaded by default in all the Add Invoice forms.
  • You can switch the Bank in the document if required.
  • Click + New Bank.
  • Fill out the details.
  • Fill required data.
  • Click Save.
  • Toggle to mark as primary.
  • Only one primary bank allowed.
  • Primary bank denoted by a white star in a purple circle.
  • A primary bank cannot be deleted.
  • When a bank is added to any document, the field drop down will carry the bank’s nick name.
  • E.g., Dubai National Bank- Al-Nahda branch -> Nickname: DNB Al-Nahda
  • Thus drop down will show “DNB Al-Nahada” as an option.
  • Click ⋮ 3 dots
  • Select Update.
  • Edit details.
  • Save changes.
  • Click ⋮ > Delete.
  • Confirm with Yes.
Note:
  • Action cannot be undone.
  • A bank marked as primary cannot be deleted.
  • Two banks can not have the same Nick Name.
Navigate to Invoice
  • Go to Dashboard
  • From the left-hand navigation panel, go to Invoices
  • Select Invoice:
    • Open the relevant invoice.
    • Invoice must be in Sent status or any of the successive stages.
  • Record Payment:
    • Click “Record Payment”
  • You’ll find your Payments list.
  • Add New Payment:
    • Click “+ Add New Payment”
    • Fill required details.
    • When selecting mode of payment, except cash, all other payment modes will require you to add a bank.
  • Under “deposit to” field, add your bank.
  • If payment is being made in cash, you will not have to add a bank.
  • Fill data and click “Add Payment”.
  • Your payment receipt will be added.
Units of Measurement General Settings Currencies  

General Settings 

  1. Log in to Zhylar.
  1. Click on “Configuration”.
  1. In the “Masters” column, click on “General Settings”.
  1. A new page will open for you.
  1. Here, you can turn on or turn off the “recent selling price” option.
When turned on, recent selling price is reflected under “Item Details” wherever an item is added in the following modules:
  • Deal
  • Quote
  • Sales Order
  • Invoice
Under the added item, select Item Details
The details will open.
The recent selling price reflects the price at which the item was sold the last time only. In comparison, the recent transaction reflects the entire transaction history of the product in the Zhylar system.

Also Read


Organization Details

  1. Log in to Zhylar
  1. Go to Left-hand panel
  2. Go to Configuration
  3. Under Profile section, select Organization Details
  1. A new page will open for you.
  1. View Organization details.
  1. Click on the yellow button “Update Organization”.
  1. Make your changes.
  1. The following details cannot be changed:
    • Legal start date
    • Base Currency
    • Discount
  2. Click Save.
Units of Measurement General Settings Currencies

Email Templates

Email templates in Zhylar offer pre-designed formats for quick communication, consistency and ensuring accuracy. These templates can be customized for brand alignment.
  • Log in to Zhylar
  • Go to Left-hand navigation panel
  • Click on Configuration
  • Under Configuration tab, select Email Template.
  • Create templates for:
    • Deal
    • Quote
    • Sales Order
    • Invoice
  • If email is sent from an integrated personal email ID, replies can be sent to the email.
  • Navigate to desired tab
  • Click + New Template.
  • A side sheet will open.
  • Enter template name
  • Note: Two templates cannot have the same name in the same module. The system will not allow duplicates.
  • Fill out remaining fields
  • Insert variables if required to customize your template. Variables are placeholders used to dynamically insert specific data—such as a customer’s name, deal value, or due date—into templates, emails, or documents
    • List of variables differ from module to module.
The image below represents the variables presented in the Sales Order module:
  • For example, if SO Expiry Date is selected, the system will automatically pick the expiry date added from the sales order.
  • Or, Contact Name is selected, the name willl be picked directly from the name added to the SO.
  • if Click Save.
  • The field options in all templates are the same except in customer portal. Here, only a Template Name, Subject and Body can be added.
  • Are you stuck whilst writing your emails?
  • At a loss for words?
  • Not sure how to write a message that will surely make an impact on your clients?
No reason to worry at all because Zhylar offers an AI email generator.
  • Click on AI ✨
  • Provide a prompt for the nature of your email.
  • The AI Email generator has generated email content.
  • Once the text is generated, you can:
  • Refine: Based on your preference, you can ask the AI email generator to refine the text.
  • Insert: Add documents or files
  • Replace: Click on Replace to add this text by removing the existing text in the email (if any)
  • Once done, click on Save to save your AI-generated email template.
  • Marked by a white star in a purple circle.
  • First template created under any tab will be automatically marked as default.
  • To Change default template, go to List View
  • Click ⋮ 3 dots
  • Select Mark as Default.
  • If there is only one template in the system, the existing template will be marked as default automatically.
To update a template,
  • Click ⋮ 3 dots
  • Select Update
  • Make your changes.
  • Click Save.
To delete a template,
  • Click ⋮ 3 dots
  • Select Delete
  • Provide confirmation.
Note: A template marked as Default Template cannot be deleted. Units of Measurement General Settings Currencies  

Email Configuration

Email configuration refers to the setup process that connects your business email account (IMAP or Outlook) with the CRM. This enables users to send, receive, track, and manage emails directly within the CRM. It ensures centralized communication, improves customer engagement, and supports features like templates, automation, and activity logging.
  • Log in to Zhylar
  • Go to Left-hand navigation panel
  • Click on Configuration
  • Under Integrations tab, select Configure Email
  • A new page will open.
  • Click on “Connect email account” to proceed.
  • Select one of the following email providers to continue.
  • You will be taken to a sign-in page. Fill in your email ID that you want to configure.
  • Select an existing account or add new account.
  1. Click Connect with Outlook.
  1. A Microsoft sign-in prompt appears.
  1. Authenticate with your Microsoft credentials.
  2. Your email has been configured.
Note: One user can configure one email ID only.
Use this option when connecting a non-OAuth email provider (for example, a company-managed mail server).

Step-by-step instructions

  • Open the email integration settings in Zhylar.
  • Select Custom IMAP/SMTP as the connection method.
  • Enter the required email server details:
    • Email address: Enter your full company email address.
    • IMAP host / port: Enter the IMAP server address (e.g., imap.example.com)
    • SMTP host / port: Enter the SMTP server address (e.g., smtp.example.com)
  • Username and password: Enter your company email login credentials.
  • Review the entered server details for accuracy.
  • Click Save to submit the configuration.
  • Once the user completes authentication or enters credentials, Zhylar sends the details to Email Engine for validation.
  • Email Engine will attempt to authenticate and establish IMAP/SMTP or API session.
  • A success or error toast message will be displayed.
  • Once a Success message is received that means you are connected. If an error message is received then user will have to check the details provided above or contact zhylar support team for the same.
After the email account is connected, configure how emails are sent and received within Zhylar.

Sending preferences

  1. Select the default From address (typically the user’s primary email).
  2. Optionally configure an email signature that Zhylar will automatically append to all outgoing messages.

Receiving preferences

  1. Select the email folder to monitor (Inbox is selected by default).
  2. Enable auto-fetch or webhook notifications for incoming emails.
Once the email connection is active:
  1. Inbound emails received via EmailEngine APIs or webhooks flow directly into the Zhylar inbox or configured ticketing workflows.
  2. Outbound emails are sent using EmailEngine’s Submit API, with the process fully managed and abstracted by Zhylar.
This ensures seamless email communication and automation across your CRM workflows. To disconnect your email ID,
  • Click on Disconnect
  • Provide confirmation.
  • Your email account will be disconnect.

Also Read

Units of Measurement General Settings Currencies