Webforms in CRM are online forms that capture customer information directly into the CRM system. They accelerate lead generation by automating data entry. This reduces manual errors and ensures leads or inquiries are instantly recorded. Follow-up occurs immediately.
To create a Web Form
- Go to Configuration from the left-hand panel
- Click on Leads
- Select Web forms
- Click on + New Web Form

- Add fields (name, email, custom questions)

- Click Save.
- To publish, open the form again. Click Publish.
- Add expiry day for the form to become inactive. Or, keep the form published forever.
- A published form cannot be deleted. It should be marked as “Archive” first.
Webform Status
Each webform will reflect a status:
- Draft– Form not published yet.
- Publish– Form published and active.
- Expired– Form has reached expiry date selected by user.
- Archive– Form moved to archive status. (irreversible action).

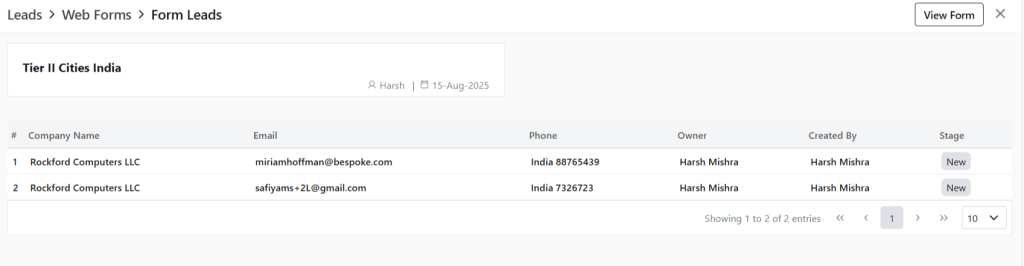
Track Leads Generated from Web Forms
- To track leads generated from a certain web form, click open the form.
- Click on View Leads

- You will be taken to a new page.
- The leads generated from this form will be visible to you.
Managing Web Forms
The actions related to web form and how to conduct them are as following:
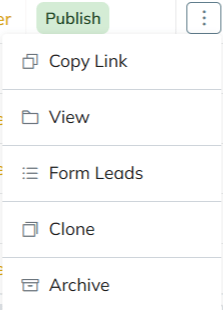
- Edit– Click ⋮ 3 dots > Update (only if draft)
- Form Leads- Click ⋮ 3 dots > Check leads received from particular web form
- Clone– Click ⋮ 3 dots > Clone > Rename form title & Save
- Copy Link– Click ⋮ 3 dots > Copy Link (Embed on website or share)
- Archive– Click ⋮ 3 dots > Archive > Confirm (Form can be deleted)
Delete Webform
- To delete a webform, you must first ensure that a form is either in Draft/Archived/Expired status.
- A form presently in Publish status cannot be deleted.
- Click ⋮ 3 dots > Mark as Archived first.
- Once done, click ⋮ 3 dots

- Select Delete (Irreversible action/ published forms cannot be deleted)
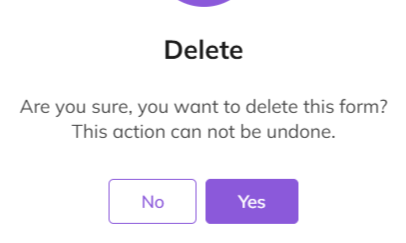
- Provide confirmation
- Your web form will be deleted.
Expired
- Once a form has reached its expiry date, the status will reflect Expired.
- This form can now be deleted, if required.
Discover how Zhylar can streamline your sales and elevate your business processes. Visit our website or book a demo today to experience the difference!

Leave a comment